前回の記事の続きになります。
Part2では、ECSで使用するコンテナを作成していきます。
皆さんの環境は異なるため同じコマンドを実行しても動作しない可能性があります。
そのため、今回はAWSのオンラインIDE(統合開発環境)であるCloud9を使用します。
Cloud9を使用することで、皆さんの環境に関係なく再現性があります。
コンテナの作成
ECSではコンテナを使用しますが、コンテナ自身は自分で用意する必要があります。
ベースとなるコンテナはDocker Hubにて提供されているため、今回用に調整を行います。
Cloud9で作業環境構築
まずは、Cloud9で作業環境構築を行います。
Cloud9の画面に移動し、Create environmentを選択。

名前と説明はお好みです。
ここでは、適当にTest-cloud9としておきます。
| 項目 | 設定値 |
|---|---|
| Name | Test-cloud9 |
| Description | Test-cloud9 |
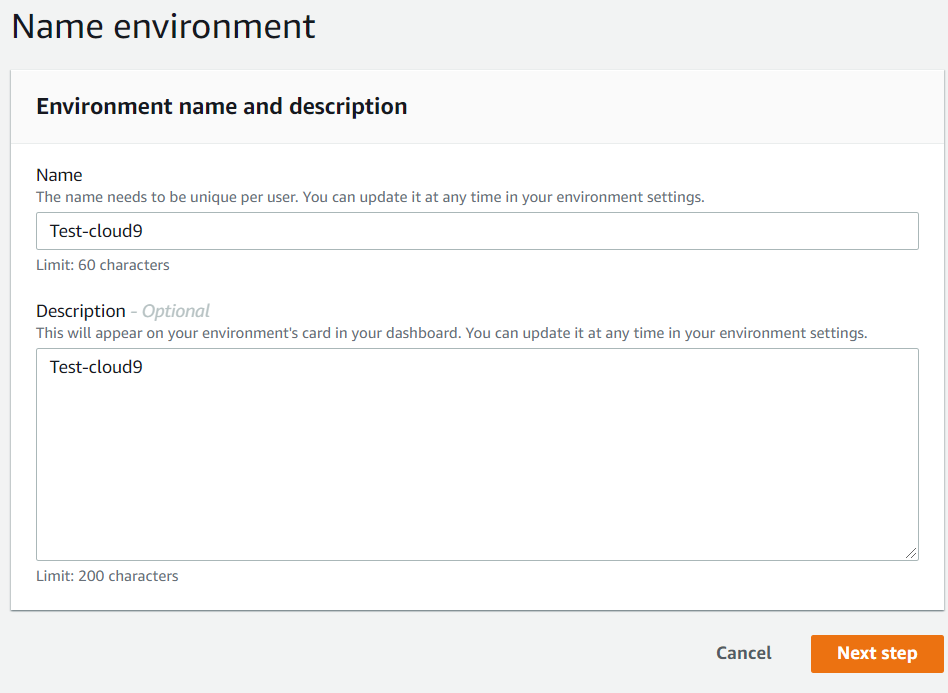
Next stepを選択。
Environment settingはすべてデフォルトの設定のままでよいです。
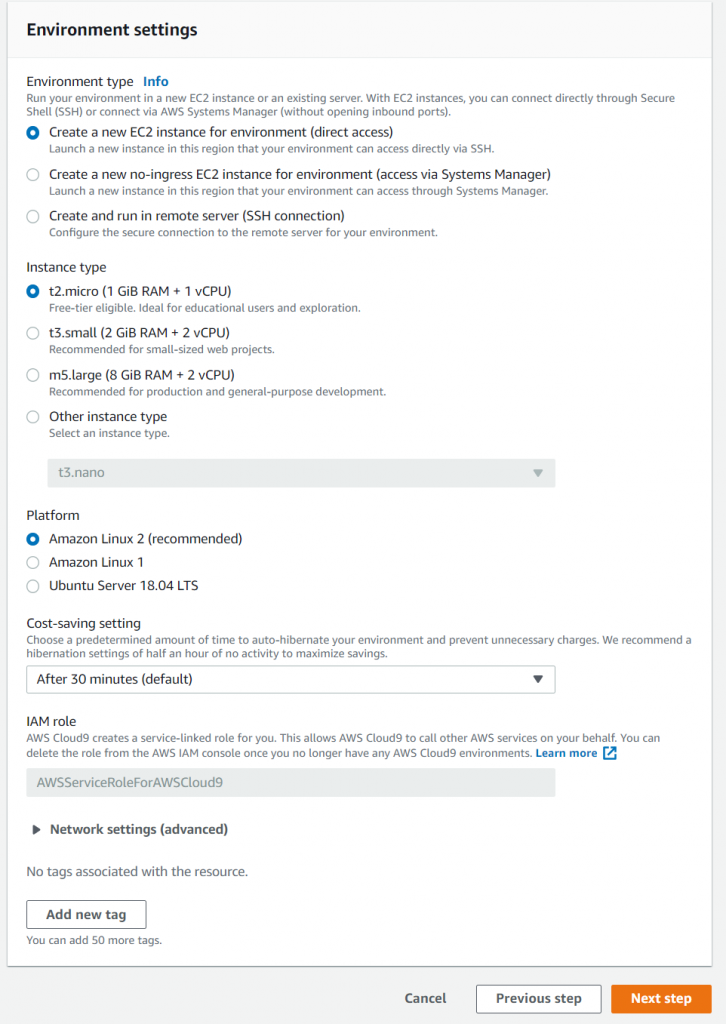
デフォルト設定のまま、Next stepを選択。
確認画面が表示されるので、確認してからCreate environmentで環境作成。
作成完了後、以下のようなWelcom画面が表示されます。
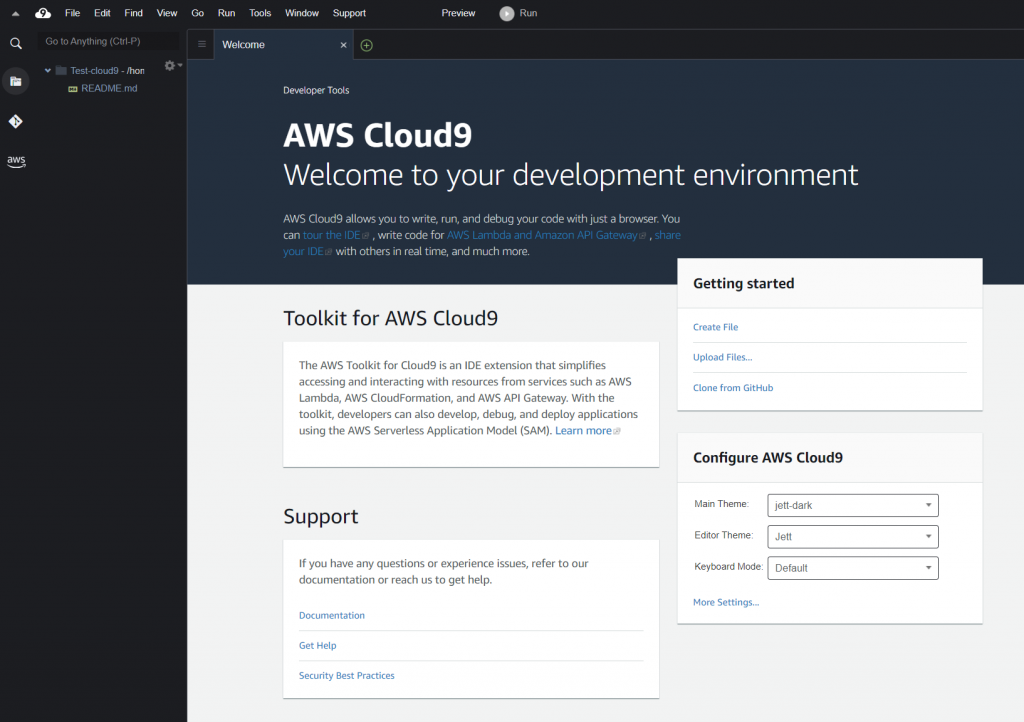
作業用の環境ができたので、次はコンテナイメージを作成していきます。
docker-composeのインストール
コンテナを作成しますが、ローカルで確認するためにdockerコマンドを利用するのは効率的ではありません。
そこで、docker-composeコマンドをインストールします。
docker公式のドキュメントを参考にコマンドを実行しましょう。
$ sudo curl -L "https://github.com/docker/compose/releases/download/1.29.2/docker-compose-$(uname -s)-$(uname -m)" -o /usr/local/bin/docker-compose
$ sudo chmod +x /usr/local/bin/docker-compose
バージョン確認ができればOKです。
$ docker-compose -v
docker-compose version 1.29.2, build 5becea4c
Djangoのコンテナイメージ
bashのコンソール画面で、djangoとnginx用のディレクトリを作成し、djangoディレクトリに移動します。
test:~/environment $ mkdir django nginx
test:~/environment $ cd django/
test:~/environment/django $ pwd
/home/ec2-user/environment/django
test:~/environment/django $ Djangoのイメージを作成するためにDockerfileを作成します。
作成はviコマンドでも、IDEの新規ファイル作成でも構いません。
ファイルの中身は以下のようになります。
FROM python:3.9-buster as builder
ENV PYTHONUNBUFFERED=1
RUN mkdir app
WORKDIR /app
RUN mkdir -p tmp/sockets
COPY requirements.txt /app/
RUN pip install -r requirements.txt

# init django
RUN django-admin startproject mysite .
COPY ./uwsgi.ini .
COPY ./settings.py mysite/

# runner
FROM python:3.9-slim-buster as production
ENV PYTHONUNBUFFERED=1
RUN mkdir app
WORKDIR /app
RUN mkdir -p tmp/sockets

RUN apt update \
  && apt install -y libpq5 libxml2 \
  && apt-get clean \
  && rm -rf /var/lib/apt/lists/*

COPY --from=builder /usr/local/lib/python3.9/site-packages /usr/local/lib/python3.9/site-packages
COPY --from=builder /usr/local/bin/uwsgi /usr/local/bin/uwsgi
COPY --from=builder /app /app

CMD uwsgi --ini uwsgi.ini
1~12行目まではビルド用のDockerイメージの作成、12行目以降はECRに登録するための小さくて軽いDockerイメージを作成しています。
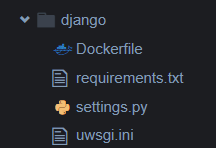
DjangoのDocker内のディレクトリ構造は以下の通りです。
/app:アプリケーション用のディレクトリ
/app/tmp/sockets:nginxとUNIXソケット通信用のディレクトリ
/app/mysite:アプリケーション
3~5行目で上記のディレクトリ構造を作成しています。
6~7行目で、Djangoなどの必要なPythonのパッケージをインストールします。
必要なパッケージの詳細はrequirements.txtに記載しており、中身は以下の通りです。
Django>=3.0,<4.0
psycopg2-binary>=2.8
uwsgi
10行目でmysiteという名前のDjangoのアプリケーションのひな形を作成します。
11行目でuwsgiの起動用ファイルuwsgi.iniを、12行目でDjangoの設定ファイルのsetting.pyをコンテナ内にコピーします。
15行目以降は、ビルド用のコンテナから必要なディレクトリ・ファイルをコピーし、最終行で起動コマンドを定義しています。
uwsgi.iniの中身は以下の通りで、wsgi.pyファイルの場所、Djangoのアプリケーションの名前、UNIXソケットファイルの場所を定義しています。
[uwsgi]
chdir = .
wsgi-file =./mysite/wsgi.py
module = mysite.wsgi:application
socket = /app/tmp/sockets/app.sock
chmod-socket = 666
setting.pyは以下の通りです。
基本的にはデフォルトの設定を使用しますが、一部調整します。
"""
Django settings for mysite project.

Generated by 'django-admin startproject' using Django 3.2.2.

For more information on this file, see
https://docs.djangoproject.com/en/3.2/topics/settings/

For the full list of settings and their values, see
https://docs.djangoproject.com/en/3.2/ref/settings/
"""

from pathlib import Path
import os
# Build paths inside the project like this: BASE_DIR / 'subdir'.
BASE_DIR = Path(__file__).resolve().parent.parent


# Quick-start development settings - unsuitable for production
# See https://docs.djangoproject.com/en/3.2/howto/deployment/checklist/

# SECURITY WARNING: keep the secret key used in production secret!
SECRET_KEY = 'django-insecure-1uot&16wp3w**7^3g%6pvrfl_ufj!7k9lp!m@*f(jrdtm7*yn='

# SECURITY WARNING: don't run with debug turned on in production!
DEBUG = True

ALLOWED_HOSTS = ['*']


# Application definition

INSTALLED_APPS = [
    'django.contrib.admin',
    'django.contrib.auth',
    'django.contrib.contenttypes',
    'django.contrib.sessions',
    'django.contrib.messages',
    'django.contrib.staticfiles',
]

MIDDLEWARE = [
    'django.middleware.security.SecurityMiddleware',
    'django.contrib.sessions.middleware.SessionMiddleware',
    'django.middleware.common.CommonMiddleware',
    'django.middleware.csrf.CsrfViewMiddleware',
    'django.contrib.auth.middleware.AuthenticationMiddleware',
    'django.contrib.messages.middleware.MessageMiddleware',
    'django.middleware.clickjacking.XFrameOptionsMiddleware',
]

ROOT_URLCONF = 'mysite.urls'

TEMPLATES = [
    {
        'BACKEND': 'django.template.backends.django.DjangoTemplates',
        'DIRS': [],
        'APP_DIRS': True,
        'OPTIONS': {
            'context_processors': [
                'django.template.context_processors.debug',
                'django.template.context_processors.request',
                'django.contrib.auth.context_processors.auth',
                'django.contrib.messages.context_processors.messages',
            ],
        },
    },
]

WSGI_APPLICATION = 'mysite.wsgi.application'


# Database
# https://docs.djangoproject.com/en/3.2/ref/settings/#databases

DATABASES = {
    'default': {
        'ENGINE': 'django.db.backends.postgresql_psycopg2',
        'NAME': os.environ['POSTGRES_NAME'],
        'USER': os.environ['POSTGRES_USER'],
        'PASSWORD': os.environ['POSTGRES_PASSWORD'],
        'HOST': os.environ['POSTGRES_HOST'],
        'PORT': os.environ['POSTGRES_PORT'],
    }
}


# Password validation
# https://docs.djangoproject.com/en/3.2/ref/settings/#auth-password-validators

AUTH_PASSWORD_VALIDATORS = [
    {
        'NAME': 'django.contrib.auth.password_validation.UserAttributeSimilarityValidator',
    },
    {
        'NAME': 'django.contrib.auth.password_validation.MinimumLengthValidator',
    },
    {
        'NAME': 'django.contrib.auth.password_validation.CommonPasswordValidator',
    },
    {
        'NAME': 'django.contrib.auth.password_validation.NumericPasswordValidator',
    },
]


# Internationalization
# https://docs.djangoproject.com/en/3.2/topics/i18n/

LANGUAGE_CODE = 'en-us'

TIME_ZONE = 'UTC'

USE_I18N = True

USE_L10N = True

USE_TZ = True


# Static files (CSS, JavaScript, Images)
# https://docs.djangoproject.com/en/3.2/howto/static-files/

STATIC_URL = '/static/'
STATIC_ROOT = os.path.join(BASE_DIR, "static/")

# Default primary key field type
# https://docs.djangoproject.com/en/3.2/ref/settings/#default-auto-field

DEFAULT_AUTO_FIELD = 'django.db.models.BigAutoField'
77~86行目で、データベースの設定を行っています。
Pythonのpsycopg2を使用し、他の設定値は環境変数から取得するようにします。
環境変数にすることにより、環境によって値が異なる箇所でも1つのファイルで済むようになります。
126行目では、Djangoのadmin画面用のCSSやJSを生成する際の出力ディレクトリになります。
以上がDjangoのDockerコンテナ生成に必要なファイルです。
ディレクトリ構成は以下のようになります。
Nginxのコンテナイメージ
Nginx用のディレクトリは作成ずみのため、nginxディレクトリに移動します。
必要なディレクトリがあるため、まず作成します。
test:~/environment/nginx$ pwd
/home/ec2-user/environment/nginx
test:~/environment/nginx$
test:~/environment $ mkdir staticNginxのイメージを作成するためにDockerfileを作成します。
作成はviコマンドでも、IDEの新規ファイル作成でも構いません。
ファイルの中身は以下のようになります。
FROM nginx:1.15.8
RUN rm -f /etc/nginx/conf.d/*
ADD nginx.conf /etc/nginx/conf.d/nginx.conf
COPY static/ /app/static/

CMD /usr/sbin/nginx -g 'daemon off;' -c /etc/nginx/nginx.conf
nginxはDockdr HUBでコンテナイメージ用意されているので、それを利用します。
2行目で不要なファイルを削除し、3行目で今回用のnginx.confファイルをコピーします。
4行目で作成したstaticディレクトリをコピーしますが、中身は後で作成します。
5行目でコンテナ内で実行するコマンドを定義します。
nginx.confファイルの中身は以下の通りです。
upstream django {
    server unix:/app/tmp/sockets/app.sock;
}
server {
    listen       80 default_server;
    listen       [::]:80 default_server;
    server_name  _;

    location / {
        include uwsgi_params;
        uwsgi_pass django;
    }

    location /static/ {
        alias /app/static/;
    }
}
1~3行目で、UNIXソケットを利用する設定をしています。
/app/tmp/sockets/app.sockファイルを経由してDjangoと通信を行います。
4行目以降で、nginxの基本設定を行っています。
14~16行目で、CSSやJSなどのstaticファイルの位置を設定しています。
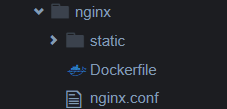
以上がNginxのDockerコンテナ生成に必要なファイルです。
ディレクトリ構成は以下のようになります。
コンテナイメージのビルド
必要なディレクトリがあるため、まず作成します。
test:~/environment $ pwd
/home/ec2-user/environment
test:~/environment $ mkdir -p volumes/data/db/コンテナイメージをビルドするためにdocker-compose.ymlファイルを作成します。
version: "3"

services:
  db:
    image: postgres
    volumes:
      - ./volumes/data/db:/var/lib/postgresql/data
    environment:
      - POSTGRES_DB=postgres
      - POSTGRES_USER=postgres
      - POSTGRES_PASSWORD=postgres
    container_name: db_postgres
  app:
    build:
      context: ./django/
    volumes:
      - tmp-data:/app/tmp
    environment:
      - POSTGRES_NAME=postgres
      - POSTGRES_HOST=db_postgres
      - POSTGRES_USER=postgres
      - POSTGRES_PASSWORD=postgres
      - POSTGRES_PORT=5432
    depends_on:
      - db
  nginx:
    build:
      context: ./nginx/
    volumes:
      - tmp-data:/app/tmp
    ports:
      - "80:80"
    depends_on:
      - app
volumes:
  tmp-data:
dbとndinxとappという名前のコンテナを作成します。
dbはdjangoをローカルで動かす用なので、使い捨てです。
dbコンテナでは、postgresのイメージを取得し、DB用のディレクトリをマウントしてあげ、DB用の環境変数を定義しています。
appコンテナ(Django)では、先ほど作成したDockerfileのディレクトリを指定し、nginxとUNIXソケット通信をするためのディレクトリをマウントし、DB接続用の環境変数を設定しています。
nginxコンテナでは、同様に先ほど作成したDockerfileのディレクトリを指定し、DjangoとUNIXソケット通信するためのディレクトリをマウントし、ポートを設定しています。
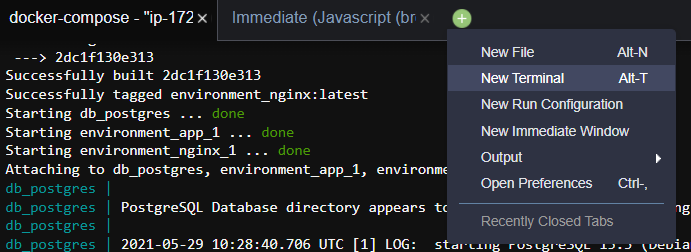
作成できたらdocker-composeコマンドでイメージをビルドして、コンテナを実行させます。
[docker-compose.ymlのあるディレクトリ] $ docker-compose up --build問題がなければ以下のように出力されて、Djangoが実行されているはずです。
db_postgres |
db_postgres | PostgreSQL Database directory appears to contain a database; Skipping initialization
db_postgres |
db_postgres | 2021-05-29 10:28:40.706 UTC  LOG:  starting PostgreSQL 13.3 (Debian 13.3-1.pgdg100+1) on x86_64-pc-linux-gnu, compiled by gcc (Debian 8.3.0-6) 8.3.0, 64-bit
db_postgres | 2021-05-29 10:28:40.706 UTC  LOG:  listening on IPv4 address "0.0.0.0", port 5432
db_postgres | 2021-05-29 10:28:40.706 UTC  LOG:  listening on IPv6 address "::", port 5432
db_postgres | 2021-05-29 10:28:40.711 UTC  LOG:  listening on Unix socket "/var/run/postgresql/.s.PGSQL.5432"
db_postgres | 2021-05-29 10:28:40.715 UTC [24] LOG:  database system was interrupted; last known up at 2021-05-29 10:17:01 UTC
db_postgres | 2021-05-29 10:28:40.732 UTC [24] LOG:  database system was not properly shut down; automatic recovery in progress
db_postgres | 2021-05-29 10:28:40.734 UTC [24] LOG:  redo starts at 0/15C6FE8
db_postgres | 2021-05-29 10:28:40.734 UTC [24] LOG:  invalid record length at 0/15C7020: wanted 24, got 0
db_postgres | 2021-05-29 10:28:40.734 UTC [24] LOG:  redo done at 0/15C6FE8
db_postgres | 2021-05-29 10:28:40.742 UTC  LOG:  database system is ready to accept connections
app_1    | [uWSGI] getting INI configuration from uwsgi.ini
app_1    | *** Starting uWSGI 2.0.19.1 (64bit) on [Sat May 29 10:28:41 2021] ***
app_1    | compiled with version: 8.3.0 on 29 May 2021 08:43:19
app_1    | os: Linux-4.14.232-176.381.amzn2.x86_64 #1 SMP Wed May 19 00:31:54 UTC 2021
app_1    | nodename: e807907e1024
app_1    | machine: x86_64
app_1    | clock source: unix
app_1    | pcre jit disabled
app_1    | detected number of CPU cores: 1
app_1    | current working directory: /app
app_1    | detected binary path: /usr/local/bin/uwsgi
app_1    | uWSGI running as root, you can use --uid/--gid/--chroot options
app_1    | *** WARNING: you are running uWSGI as root !!! (use the --uid flag) ***
app_1    | chdir() to .
app_1    | *** WARNING: you are running uWSGI without its master process manager ***
app_1    | your memory page size is 4096 bytes
app_1    | detected max file descriptor number: 1024
app_1    | lock engine: pthread robust mutexes
app_1    | thunder lock: disabled (you can enable it with --thunder-lock)
app_1    | uwsgi socket 0 bound to UNIX address /app/tmp/sockets/app.sock fd 3
app_1    | uWSGI running as root, you can use --uid/--gid/--chroot options
app_1    | *** WARNING: you are running uWSGI as root !!! (use the --uid flag) ***
app_1    | Python version: 3.9.5 (default, May 12 2021, 15:36:59)  [GCC 8.3.0]
app_1    | *** Python threads support is disabled. You can enable it with --enable-threads ***
app_1    | Python main interpreter initialized at 0x557e1dedbfe0
app_1    | uWSGI running as root, you can use --uid/--gid/--chroot options
app_1    | *** WARNING: you are running uWSGI as root !!! (use the --uid flag) ***
app_1    | your server socket listen backlog is limited to 100 connections
app_1    | your mercy for graceful operations on workers is 60 seconds
app_1    | mapped 72920 bytes (71 KB) for 1 cores
app_1    | *** Operational MODE: single process ***
app_1    | WSGI app 0 (mountpoint='') ready in 0 seconds on interpreter 0x557e1dedbfe0 pid: 6 (default app)
app_1    | mountpoint  already configured. skip.
app_1    | uWSGI running as root, you can use --uid/--gid/--chroot options
app_1    | *** WARNING: you are running uWSGI as root !!! (use the --uid flag) ***
app_1    | *** uWSGI is running in multiple interpreter mode ***
app_1    | spawned uWSGI worker 1 (and the only) (pid: 6, cores: 1)
LOG: starting PostgreSQL 13.3 (Debian 13.3-1.pgdg100+1) on x86_64-pc-linux-gnu, compiled by gcc (Debian 8.3.0-6) 8.3.0, 64-bit
db_postgres | 2021-05-29 10:28:40.706 UTC LOG: listening on IPv4 address "0.0.0.0", port 5432
db_postgres | 2021-05-29 10:28:40.706 UTC LOG: listening on IPv6 address "::", port 5432
db_postgres | 2021-05-29 10:28:40.711 UTC LOG: listening on Unix socket "/var/run/postgresql/.s.PGSQL.5432"
db_postgres | 2021-05-29 10:28:40.715 UTC [24] LOG: database system was interrupted; last known up at 2021-05-29 10:17:01 UTC
db_postgres | 2021-05-29 10:28:40.732 UTC [24] LOG: database system was not properly shut down; automatic recovery in progress
db_postgres | 2021-05-29 10:28:40.734 UTC [24] LOG: redo starts at 0/15C6FE8
db_postgres | 2021-05-29 10:28:40.734 UTC [24] LOG: invalid record length at 0/15C7020: wanted 24, got 0
db_postgres | 2021-05-29 10:28:40.734 UTC [24] LOG: redo done at 0/15C6FE8
db_postgres | 2021-05-29 10:28:40.742 UTC LOG: database system is ready to accept connections
app_1 | [uWSGI] getting INI configuration from uwsgi.ini
app_1 | *** Starting uWSGI 2.0.19.1 (64bit) on [Sat May 29 10:28:41 2021] ***
app_1 | compiled with version: 8.3.0 on 29 May 2021 08:43:19
app_1 | os: Linux-4.14.232-176.381.amzn2.x86_64 #1 SMP Wed May 19 00:31:54 UTC 2021
app_1 | nodename: e807907e1024
app_1 | machine: x86_64
app_1 | clock source: unix
app_1 | pcre jit disabled
app_1 | detected number of CPU cores: 1
app_1 | current working directory: /app
app_1 | detected binary path: /usr/local/bin/uwsgi
app_1 | uWSGI running as root, you can use --uid/--gid/--chroot options
app_1 | *** WARNING: you are running uWSGI as root !!! (use the --uid flag) ***
app_1 | chdir() to .
app_1 | *** WARNING: you are running uWSGI without its master process manager ***
app_1 | your memory page size is 4096 bytes
app_1 | detected max file descriptor number: 1024
app_1 | lock engine: pthread robust mutexes
app_1 | thunder lock: disabled (you can enable it with --thunder-lock)
app_1 | uwsgi socket 0 bound to UNIX address /app/tmp/sockets/app.sock fd 3
app_1 | uWSGI running as root, you can use --uid/--gid/--chroot options
app_1 | *** WARNING: you are running uWSGI as root !!! (use the --uid flag) ***
app_1 | Python version: 3.9.5 (default, May 12 2021, 15:36:59) [GCC 8.3.0]
app_1 | *** Python threads support is disabled. You can enable it with --enable-threads ***
app_1 | Python main interpreter initialized at 0x557e1dedbfe0
app_1 | uWSGI running as root, you can use --uid/--gid/--chroot options
app_1 | *** WARNING: you are running uWSGI as root !!! (use the --uid flag) ***
app_1 | your server socket listen backlog is limited to 100 connections
app_1 | your mercy for graceful operations on workers is 60 seconds
app_1 | mapped 72920 bytes (71 KB) for 1 cores
app_1 | *** Operational MODE: single process ***
app_1 | WSGI app 0 (mountpoint='') ready in 0 seconds on interpreter 0x557e1dedbfe0 pid: 6 (default app)
app_1 | mountpoint already configured. skip.
app_1 | uWSGI running as root, you can use --uid/--gid/--chroot options
app_1 | *** WARNING: you are running uWSGI as root !!! (use the --uid flag) ***
app_1 | *** uWSGI is running in multiple interpreter mode ***
app_1 | spawned uWSGI worker 1 (and the only) (pid: 6, cores: 1) LOG: starting PostgreSQL 13.3 (Debian 13.3-1.pgdg100+1) on x86_64-pc-linux-gnu, compiled by gcc (Debian 8.3.0-6) 8.3.0, 64-bit
db_postgres | 2021-05-29 10:28:40.706 UTC
LOG: starting PostgreSQL 13.3 (Debian 13.3-1.pgdg100+1) on x86_64-pc-linux-gnu, compiled by gcc (Debian 8.3.0-6) 8.3.0, 64-bit
db_postgres | 2021-05-29 10:28:40.706 UTC 次は、Nginxに配置するためのstaticファイルを作成作成します。
staticファイルは、Djangoで表示したいadminページのcssなどです。
まずは、docker-composeを実行したままcloud9にて新しいターミナルを作成します。
新しいターミナルから、動かしているDjangoにてstaticのファイルを作成するコマンドを実行します。
以下のようなログになるので、一応lsコマンドでstaticディレクトリが作成されていることを確認します。
$ docker-compose exec app python manage.py collectstatic

128 static files copied to '/app/static'.
$ docker-compose exec app ls -l
total 12
-rwxr-xr-x 1 root root 662 May 29 08:44 manage.py
drwxr-xr-x 1 root root  25 May 29 10:51 mysite
-rw-rw-r-- 1 root root  44 May 25 14:56 requirements.txt
drwxr-xr-x 3 root root  19 May 29 10:52 static
drwxr-xr-x 3 root root  21 May 29 10:02 tmp
-rw-rw-r-- 1 root root 133 May 25 23:54 uwsgi.iniappはdocker-compose.ymlファイルで定義しているDjangoのコンテナイメージの名前です。
作成されたstaticファイルを、ローカルのnginxディレクトリにコピーします。
コンテナIDを動的に取得しているため、そのまま実行できます。
$ docker cp `docker-compose ps -q app`:/app/static nginx/

$ ls nginx/static/admin/
css  fonts  img  js
次は、テスト用のDBにDjango用のテーブルを作成し、問題がないことを確認します。
$ docker-compose exec app python manage.py migrate
Operations to perform:
  Apply all migrations: admin, auth, contenttypes, sessions
Running migrations:
  Applying contenttypes.0001_initial... OK
  Applying auth.0001_initial... OK
  Applying admin.0001_initial... OK
  Applying admin.0002_logentry_remove_auto_add... OK
  Applying admin.0003_logentry_add_action_flag_choices... OK
  Applying contenttypes.0002_remove_content_type_name... OK
  Applying auth.0002_alter_permission_name_max_length... OK
  Applying auth.0003_alter_user_email_max_length... OK
  Applying auth.0004_alter_user_username_opts... OK
  Applying auth.0005_alter_user_last_login_null... OK
  Applying auth.0006_require_contenttypes_0002... OK
  Applying auth.0007_alter_validators_add_error_messages... OK
  Applying auth.0008_alter_user_username_max_length... OK
  Applying auth.0009_alter_user_last_name_max_length... OK
  Applying auth.0010_alter_group_name_max_length... OK
  Applying auth.0011_update_proxy_permissions... OK
  Applying auth.0012_alter_user_first_name_max_length... OK
  Applying sessions.0001_initial... OK
ここでdocker-composeで動かしているコンテナを停止させます。
「Ctrl+c」を数回ほど入力すると止まります。
エラーは無視してもよいです。
app_1    | spawned uWSGI worker 1 (and the only) (pid: 7, cores: 1)
^CGracefully stopping... (press Ctrl+C again to force)
Stopping environment_nginx_1   ...
Stopping environment_app_1     ...
Stopping db_postgres           ...
Killing environment_nginx_1    ... done
Killing environment_app_1      ... done
Killing db_postgres            ... done
ERROR: 2
もう一度ビルドさせて、完全な状態のコンテナイメージを作成します。
–buildオプションは忘れないよう!
$ docker-compose up --buildローカルでの確認はここまでとし、次からはAWSの操作に戻ります。
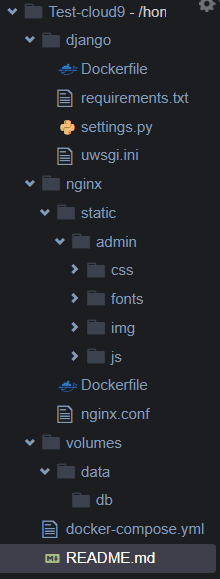
最後に、Cloud9の上でのディレクトリ・ファイル構成を掲載しておきます。
ECRにコンテナ登録
ECSはECRからコンテナを取得します。
まずはECRにリポジトリを作成します。
リポジトリの作成
Amazon ECRの画面に移動し、リポジトリを作成を選択。

DjangoとNginxように2つのリポジトリを作成します。
Django用リポジトリ
| 項目 | 設定値 |
|---|---|
| 可視性設定 | プライベート |
| リポジトリ名 | test-django |
| タグのイミュータビュリティ | 無効 |
| プッシュ時にスキャン | 有効 |
| KMS暗号化 | 無効 |
Nginx用リポジトリ
| 項目 | 設定値 |
|---|---|
| 可視性設定 | プライベート |
| リポジトリ名 | test-nginx |
| タグのイミュータビュリティ | 無効 |
| プッシュ時にスキャン | 有効 |
| KMS暗号化 | 無効 |
プッシュ時にスキャンを有効にしておけば、イメージの脆弱性を教えてくれます。
設定したらリポジトリを作成を選択。
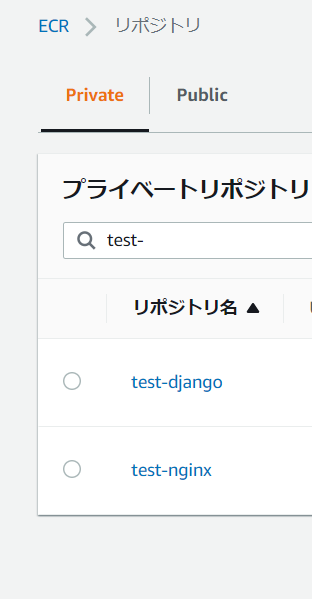
作成できたら、以下のように見えているはずです。
イメージのプッシュ
リポジトリにアクセスするとプッシュコマンドの表示というボタンがあります。
基本的には、そこに記載のプッシュコマンドを実行すればECRにイメージをプッシュすることができます

今回は、先ほどdocker-composeコマンドにて作成したコンテナイメージを登録します。
まずはCloud9のターミナルからECRにログインします。
「$(aws ecr get-login –no-include-email)」を実行するだけです。
必ず$マークは含めてください
$ $(aws ecr get-login --no-include-email)
WARNING! Using --password via the CLI is insecure. Use --password-stdin.
WARNING! Your password will be stored unencrypted in /home/ec2-user/.docker/config.json.
Configure a credential helper to remove this warning. See
https://docs.docker.com/engine/reference/commandline/login/#credentials-store

Login Succeeded
先ほど作成したイメージを確認します。
Cloud9のデフォルトのディレクトリで作成していると、REPOSITORY名がenvironment_XXXになっているはずです。
test:~/environment $ docker image ls
REPOSITORY          TAG               IMAGE ID       CREATED             SIZE
environment_app     latest            8c70ad8d5907   About an hour ago   201MB
environment_nginx   latest            4bfe558cb830   About an hour ago   111MB
REPOSITORY名とTAGをECR用に調整します。
$ docker tag `docker image ls environment_app -q` [AWS_ACCOUNT_ID].dkr.ecr.ap-northeast-1.amazonaws.com/test-django:0.1
$ docker tag `docker image ls environment_nginx -q` [AWS_ACCOUNT_ID].dkr.ecr.ap-northeast-1.amazonaws.com/test-nginx:0.1[AWS_ACCOUNT_ID]の箇所は、ご自身のAWSのアカウントIDに調整してください。
調整ができたら、docker-composeにて作成したイメージと同じIMAGE IDを持つ、名前がECR用に調整されたものができています。
$ docker image ls | grep -e "test-" -e "environment"
[AWS_ACCOUNT_ID].dkr.ecr.ap-northeast-1.amazonaws.com/test-django   0.1               8c70ad8d5907   About an hour ago   201MB
environment_app                                                 latest            8c70ad8d5907   About an hour ago   201MB
[AWS_ACCOUNT_ID].dkr.ecr.ap-northeast-1.amazonaws.com/test-nginx    0.1               4bfe558cb830   2 hours ago         111MB
environment_nginx                                               latest            4bfe558cb830   2 hours ago         111MB
最後に、イメージをECRにプッシュします。
$ docker push [AWS_ACCOUNT_ID].dkr.ecr.ap-northeast-1.amazonaws.com/test-nginx:0.1
The push refers to repository [[AWS_ACCOUNT_ID].dkr.ecr.ap-northeast-1.amazonaws.com/test-nginx]
XXXXXXXXXXX: Pushed
XXXXXXXXXXX: Pushed
0.1: digest: sha256:XXXXXXXXXXXXXXXXXXXXXXXXXXXXXXXXXXXXXXXXXXXXXXXXXXXXXXXXXXXXXXXX size: 1572

$ docker push [AWS_ACCOUNT_ID].dkr.ecr.ap-northeast-1.amazonaws.com/test-django:0.1
The push refers to repository [[AWS_ACCOUNT_ID].dkr.ecr.ap-northeast-1.amazonaws.com/test-django]
XXXXXXXXXXX: Pushed
XXXXXXXXXXX: Pushed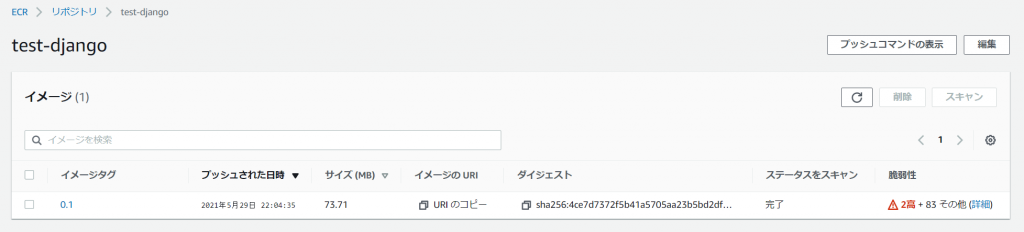
0.1: digest: sha256:XXXXXXXXXXXXXXXXXXXXXXXXXXXXXXXXXXXXXXXXXXXXXXXXXXXXXXXXXXXXXXXX size: 2626リポジトリを確認し、イメージタグが0.1のものが登録されていることを確認します。
Django用リポジトリ
Nginx用リポジトリ
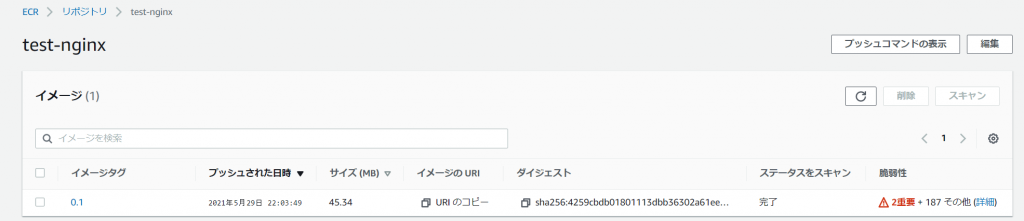
脆弱性スキャンも行われているので、後で確認しておきましょう。
まとめ
このPartでは、Cloud9で作業環境構築を行い、DjangoとNginxのイメージをビルドし、ECRにプッシュを行いました。
ECS動かす用のイメージが作成できたため、最後のPart3ではECSで作成したイメージを動かします!